Automatic bank payments webinar
Hi! I’m Lissi. In this video, we’re going to learn why automatic bank payments are awesome, how they work, and how you can set them up for your business today. You could be saving hundreds or thousands of dollars right now, just by collecting your payments differently. Collecting automatic bank payments are going to save you time, money, and facilitate a better customer relationship.
Automatic bank payments are also referred to as Pre-Authorized Debits (PADs).
Just so we are on the same page, a pre-authorized debit is a bank to bank transfer initiated by the payee (you or your business) when the payor (your customer) gives permission to do so. Simple as that. So before we jump into the exact process of how you get paid, let’s talk about why you should be setting up these automatic payments for your small business.
Why small business should set up this payment method
Here’s an example of how most businesses get paid; As work gets done, or once the month is over, they send an invoice to their customers and wait for them to initiate a credit card payment or send in a cheque. I’m sorry to say but this model is broken. Don’t worry though because automatic payments can make your life a whole lot easier. The problem with the traditional payment process is:
- You have no control over when you get paid. “Cash is king,” and everybody knows it. When you don’t have automatic payments set up, you are at the mercy of your customer and are probably waiting on them to pay you. You already provided your service, why should you allow your customers to choose when they pay for it? With automatic payments, you decide when payment is withdrawn from your customer’s bank account.
- The true cost of credit cards is not small-business friendly. I understand that you want to give your customers every opportunity to pay you, but how much does this actually cost you? Most online credit card processors charge 2.9% on every payment. If you invoice your client for $500 every month, that’s nearly $180 in fees a year for just one customer. Paying a flat rate per transaction, with automatic payments, gives you much better value and could literally save you hundreds (if not thousands) of dollars each month.
- It isn’t worth your time. Each time a customer sends you a cheque, you have to deposit it and reconcile with your accounting platform. This is time-consuming work that could be better spent on growing your business or teaching new skills to your employees. With automatic payments, you set it and forget it.
- It doesn’t facilitate beneficial customer relationships. Not only is chasing down late payments the worst item on your “to-do” list, but I’m sure it takes away from your customer relationship — or even makes things awkward. With automatic payments, you agree on a date for that money to sent to you ahead of time and then never have to talk about it again.
So then, I want to show you how, instead of creating an invoice and waiting for your customers to initiate payments, you actually initiate the payment directly from your customer’s bank account.
How to automate bank payments
Let’s dive into exactly how to automate payments.
- The first step is to Find a processor because, in order to withdraw money from your customer’s bank account, you will need to find a processor who can facilitate the payment. This is typically your bank or a third-party payment processor like Rotessa. Historically, bank systems are pretty complicated and do not integrate well with your accounting system. Third-party processors usually have integrations and give you a much more competitive rate for lower volume transactions. The user experience is also way friendlier. So once you have signed up with a processor, you will be given access to an online portal that allows you to set up customers and schedule payments from those customers.
- Next, you will collect authorization from your customers. This is an agreement that outlines agreement outlines the payment terms, gives you the proper authorization to initiate payments and tells you what account the customer will be paying you from.
Requirements of a pre-authorized debit form
Payments Canada, the governing body that regulates pre-authorized debits, has outlined what is required in a pre-authorized debit agreement to ensure both parties are on the same page. Let’s quickly review the required elements:
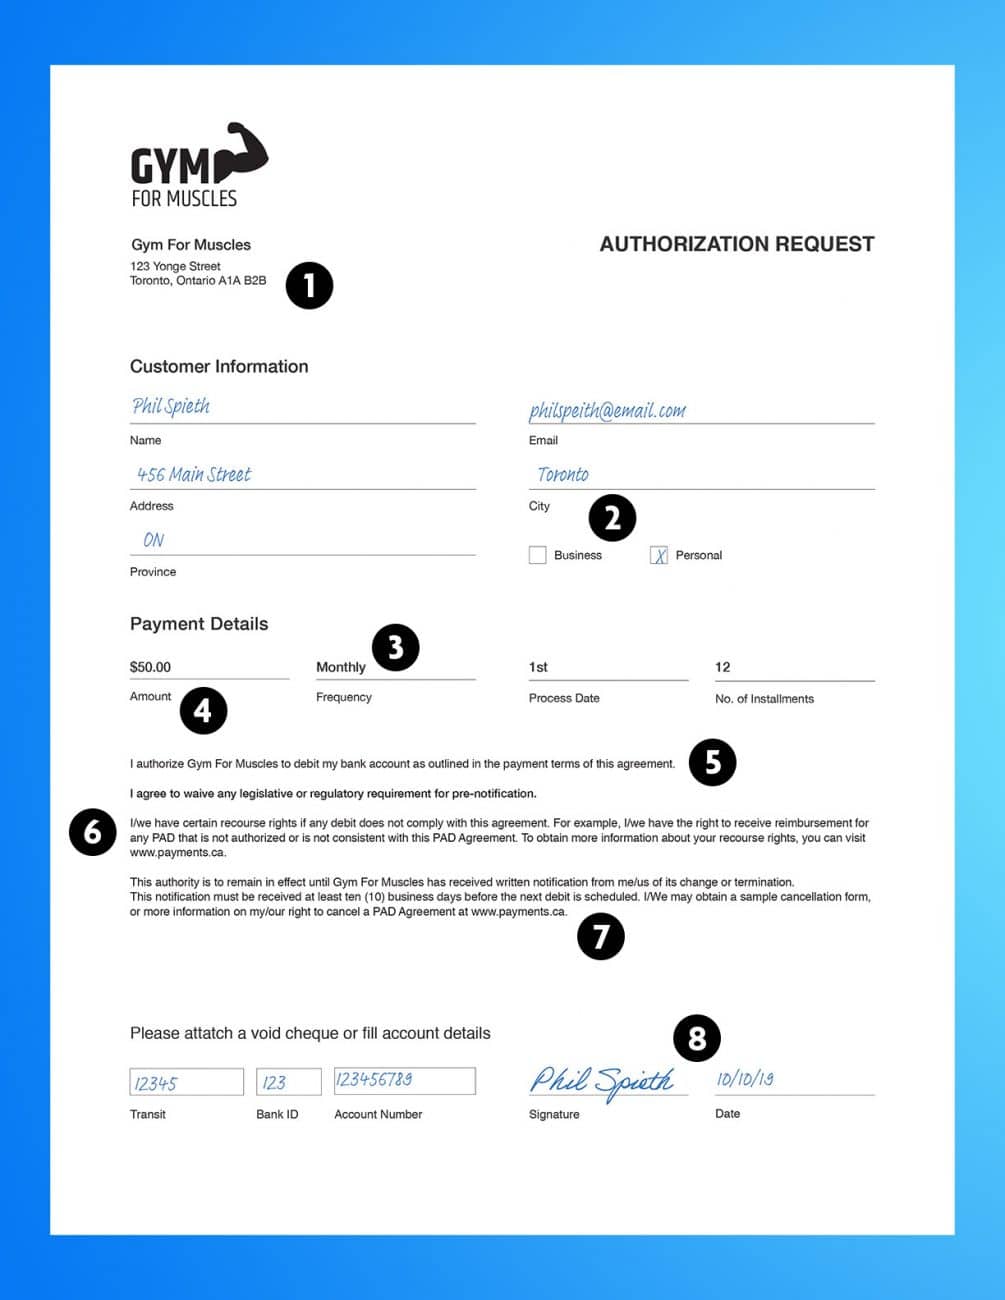
- You’ll need contact details for both parties – so you can get in touch with each other.
- The PAD type defined if the payor is a person or a business.
- Timing outlines, to the payor, when the payments are to be taken out. Some businesses do weekly, monthly, annual schedules or just on specific dates. You also need to explain if each payment is to be triggered by a specified act, event or other criteria. If it’s to be triggered by a specific act, it needs to be clear on what that is clarified.
- Obviously, you need to determine the amount your customer will pay, so they know how much is being taken from their account. Make sure to clearly state if this is an open or variable authorization.
- The Authorization Statement is where the payor agrees to the money being taken out of the account outlined above.
- Recourse Statement explains the payor’s rights when it comes to stopping the agreement.
- Cancelation Details explains how to cancel the agreement for the payor.
- If you are having the payor sign this agreement in person, you’ll need the date of the agreement and their signature.
Pre-authorized debit agreements can actually be completed both in person or online. Here’s an example of what an electronic PAD agreement looks like in Rotessa. We provide our users with a unique and secure link to email over this form to their customers in the event they don’t see them in person.
Now that you’re Pre-authorized debit is in place with your customers, you are now ready to take control and start scheduling payments. Let’s dive into a couple of real-life examples from Rotessa to best show you how this works.
Real small business example

Let’s say you’re a fitness center, we’ll call you: Gym for Muscles. John Smith is your latest customer. When John signed up for his membership, you included a pre-authorized debit agreement that included his banking info and allows you to take $55 from his account on the first of each month for 12 months.
You simply add John into Rotessa like this:
- Start on the Customers page.
- Select Add Customer, then Manually Enter in a New Customer.
- Input the customer’s name and their banking details.
- Select Save Customer to add them to your account.
Now that John’s profile is complete, you can create the payment schedule to reflect the pre-authorized debit agreement:
- Set the amount to $55
- Set your first process date to Oct 1
- With a monthly payment frequency
- His membership (and agreement) is only for 1 year, so set 12 for the number of installments.
- If he signed up for a special offer or package, you can add that in the comment section. (Add “Gold Plan” as the comment.)
That’s it, John is all set up. Based on the schedule you entered, the money will be withdrawn from John’s bank account and sent to yours. You never have to wait on John to send in payments!
So your gym and John were an example of a fixed, recurring schedule, but now let’s go over another example with variable amounts.
Another small business example

In this case, you are now Betty’s Bookkeeping. Imagine: You work for other small businesses in your area and invoice them each month based on the number of hours you work — no two invoices are the same. One of your clients, Sams Storage, filled out and gave you an open authorization when they signed up for your services. This authorization allows you to withdraw your fees from their bank account regardless of the amount.
Same as before: start by entering Sams Storage details as a customer. Once their profile is set up, you can create a payment in Rotessa based on billable hours. For the month of October, Sam’s invoice is $357. To create the single payment in Rotessa:
- Set the amount to $357
- And set the process date for October 15
- The payment frequency this time is just “once”
- For our records, we’ll put in “Invoice 2343” as the comment
That’s it! Now on October 15th, $357 will be pulled from Sams Storage account and settled to yours. It’s that easy!
In both situations – the gym and the bookkeeper – you should remember that when you are scheduling payments, the processing date on your scheduled transaction is the day the money will be withdrawn from your customer’s account. You’ll receive the settlement of funds 4 to 5 business days later. So make sure to schedule accordingly.
On that settlement day, your payment processor will provide a settlement report. With Rotessa, you get those reports for free. In the event of a declined transaction, their reasons will be easily displayed and you can resolve that one-on-one with your customer.
Here’s a pro tip: If you use Quickbooks Online or Xero for your real-life business, Rotessa has integrations that allow you to automatically create payments in Rotessa based on invoice totals and due dates created in those accounting softwares. Feel free to check out our support pages for more details or reach out to us for a demo to learn how to set that up.
So, just like that, we set up two businesses with an automatic, easy, and inexpensive way to get paid!
Need more information or have questions? Feel free to reach out for a one-on-one demo or send an email to our team.


